UE4 ArcadeVS Plugin
Hi, Thanks for checking out ArcadeVS! Here you will find the latest documentation for UE4’s Arcade Vehicle System plugin and its DemoProject.
Check ArcadeVS on the Marketplace Download the DemoProject
Get the new PC Demo v1.1
v1.1 Update RELEASED
The update is now available on the marketplace. For all the details about the new features and changes, it’s here!
Table of contents
- Why ArcadeVS?
- Plugin architecture
- C++ Vehicle System
- C++ / Blueprint API
- Blueprints
- Animation System
- C++ Visualizer
Why ArcadeVS?
Like any other physics based systems in a game, getting a Vehicle System right is very tricky.
Getting the code to work is one thing, but once that’s done, the real work of getting something that’s actually fun to use begins.
The biggest issue with Vehicle System is usually their complexity and inter-connected settings.
You tweak something for days, ajusting the tire fiction, suspensions, torque until it feels right and then you realize you need to change the mass of the vehicle for whatever reason and you’re back to step 1.
So after reading a lot of documentation and looking at how some game studios solved this kind of issues, I realized that for most games (except dedicated hardcore simulations), it comes down to the following points:
- Simplify the physics system to its most basic elements
- Try to decouple parameters as much as you can so that changes on one won’t affect the others
- Use animations and fake as much things as you can. This is very important as it will allow artists and gameplay designers to have the exact animation look they want without adding any requierement on the physics model. You want a car that tilts when braking? Instead of moving the center of mass of each of your vehicles to get it right, simply play a skeletal mesh animation.
So that’s basically what I’m trying to do with ArcadeVS, make a system that’s simple to use and to setup and most of all that makes fun to drive vehicles.
If you’re working on your own Vehicle System or simply want to know more, you should check those two awsome videos:
- https://www.gdcvault.com/play/1024972/It-IS-Rocket-Science-The/
- http://blog.spaceduststudios.com/space-dust-racing-unreal-engine-4-arcade-vehicle-physics-tour/
Now, let’s check out the plugin!
Plugin architecture
ArcadeVS is a code plugin with content. The main Vehicle System is just one C++ class that inherits UE Pawn’s class, it’s self contained. The idea was to have all the logic at the same place, easily understandable and to have all the system’s parameters properly exposed on the root object.
This means that you won’t have to dig into your components to find a specific settings or won’t have to create complex stuff like Tire Materials to get your vehicle up and running.
The plugin also contains some example blueprint vehicles classes and animation blueprints. Those vehicles inherits the main Vehicle System class and serves as examples on how to properly setup a vehicle. They have a skeletal mesh, some suspension points registered and their parameters have been fine tuned to make sure that they behave properly.
C++ Vehicle System
The Vehicle System is physics based. This means that all movement is due to physic forces being applied to the root component of the Vehicle Actor, which is the Skeletal Mesh component.
Features
Here is a list of the main features of the Vehicle System. For a complete list of all the settings available, please check the [Vehicle System Settings page].
- Suspension system: the suspensions are implemented using raycasts. This means that your wheels will not have any collision at all. Only the body of the car will have an actual collision geometry. This works very weel in practice and simplifies the setup of a Vehicle a lot. The suspensions have settings for height and damping. For all details please check here [Setting Up a Vehicle]
- Acceleration: can be controlled either by an InputAction (when using a simple button) or an InputAxis (when using a Trigger for example)
- Braking: can also be controller by an InputAction or InputAxis. Supports going in Reverse when braking and speed is < 0.
- Turning: works by adding torque to the Vehicle. Turning works in conjuction with adherence, if you were to set the Adherence force to 0 the car would simply rotate around it’s Z-axis while keeping the same direction. Supports setting min and max turning speed based on your current speed to give the feeling of a power steering system (see Settings). Support wheels direction smoothing and animation back to rest position.
- Adherence: works by adding a lateral force proportional to the slide angle of the vehicle. This is what gives the feeling of sticking to the road or sliding/drifting.
- Jumping: works by deactivating suspension forces for a short amount of time and applying and upward force.
- In Air Stabilization: if enabled, this will try to align the vehicle up vector with the Z-vector when the vehicle is considered airborne. This can also be used if the car is stuck flipped to make it go back on its wheels.
- Drifting: with the simplest settings, drifting simply applies a nerf to the adherence force and an offset to the turning scale registered from the controller. But I wanted to get as close as I could to the Mario Kart system so I’ve added many settings to allow for keeping your speed while drifting, increasing your rotation angle and other cool stuff. You can check all the drift mechanic settings [here]
C++ / Blueprint API
C++
The Vehicle System Logic is done in C++, but almost all functions are marked virtual and can be overriden by extending the class in C++. The goal is that anyone can customize the system like he wants. For example, if you don’t like how the vehicles accelerate or jump, simply create a new C++ vehicle class and rewrite the Accelerate() or Jump() functions.
Blueprints Events
For Blueprints, most of the parameters concerning the current state of the Vehicle are exposed to blueprints to make adding Blueprint gameplay logic easier and keep your classes cleaner. Do you want to add a Particle VFX where the wheels contact with the ground? Simply check the Suspension Hit Results array and look for the ImpactPoint values.
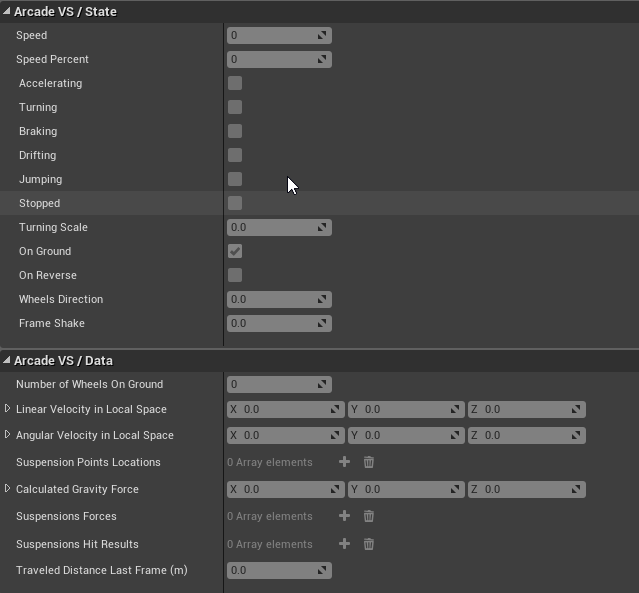
The data will also be visible when debugging at runtime
There’s also specific Blueprint implementable events broadcasted for every major state change in the system that you can easily implement to trigger VFX, SFXs or whatever logic you want.
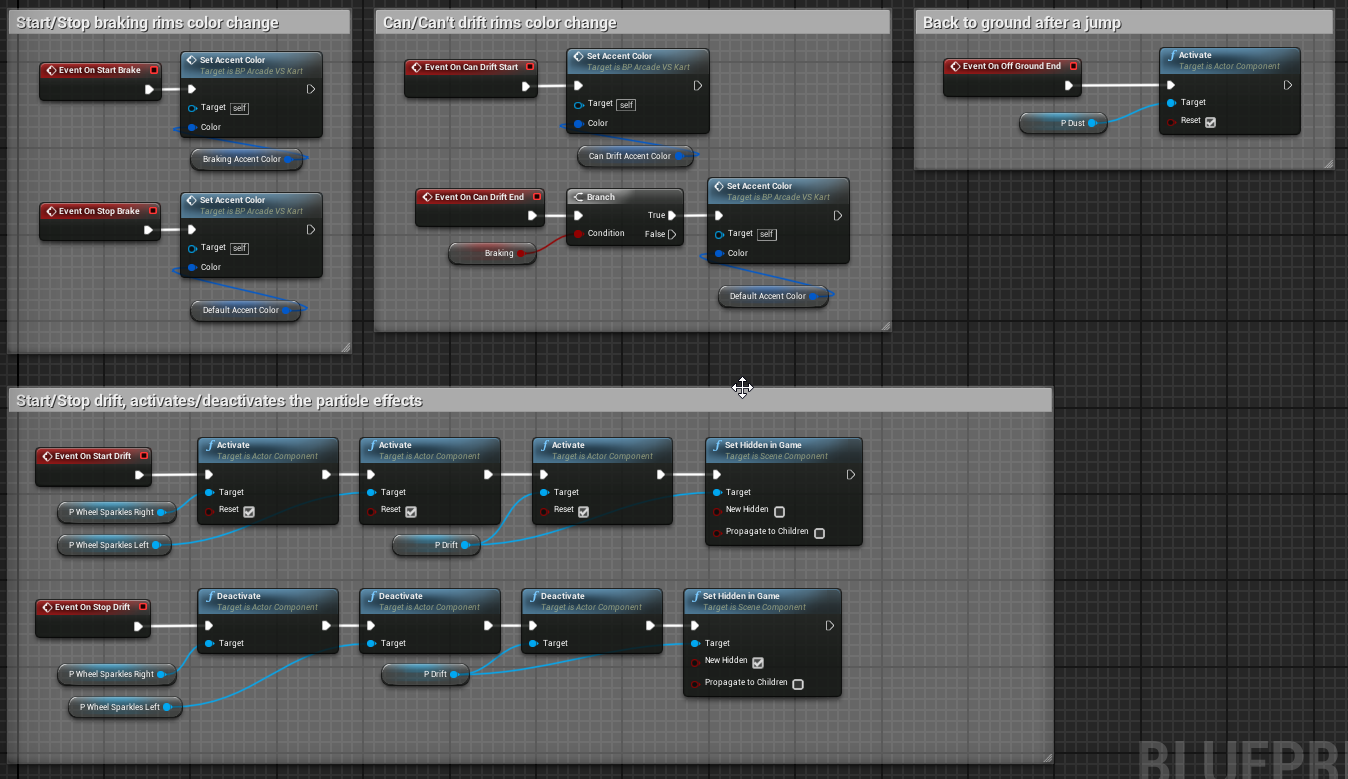 This is a screenshot from the Kart Vehicle Blueprint that shows how you can simply add gameplay and visual details on a Vehicle by using the provided Blueprint events API
C++ PlayerController and simple AnimationInstance
The two additional C++ classes that come with the project are very simple. The PlayerController class is here to give a simple example on how to setup a PlayerController for a Vehicle. This class does not setup any bindings, it just acts as a base class for a Blueprint PlayerController class. The idea is to have the logic in C++ and the actual Action/Axis bindings in the Blueprint.
The AnimationInstance acts just an interface. Right now, the SkeletalMesh Animation Instance is driven by the ArcadeVS C++ vehicle class. The vehicle class is responsible to update the animation instance wheels rotation, wheels direction and drift direction variables so that the animation can react properly.
Blueprints
The plugin comes with some Blueprint classes to demonstrate its features.

Template Vehicle
The Test Vehicle is simple ArcadeVS Vehicle with almost no Blueprint Logic added. It has a dummy Skeletal Mesh that has been rigged to have 4 wheels bones when the center of the wheels would be. Those bones are used as the location points for the Suspension System.
Its settings are very close to the default settings of the system. It has the following behavior:
- Offset center of mass to the front (where the engine would be)
- Suspensions are a little loose
- Good adherence, the vehicle will never drift without user action
- Little adherence force vertical offset to give the feeling that the car is rolling when turning at high speed
- Drift settings where it will not loose too much speed while loosing a little adherence and getting a nice turn angle boost
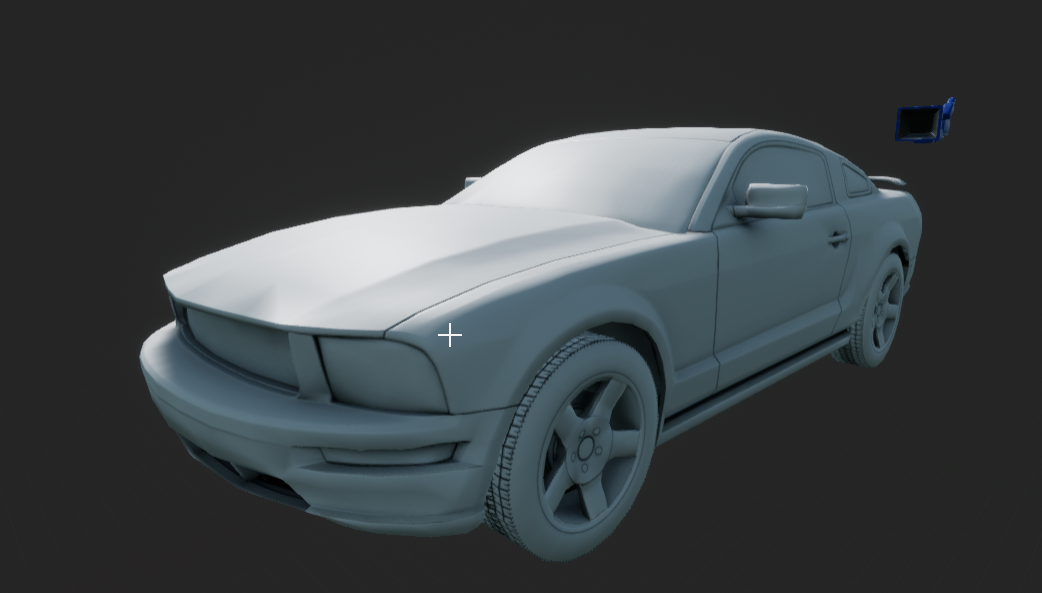
Sports Vehicle
new in v1.1
The Sports vehicle takes full use of the new Animator components to show how to make a more realistic vehicle. This vehicle looks and feels more like the kind of vehicle that you would find in games like GTA.
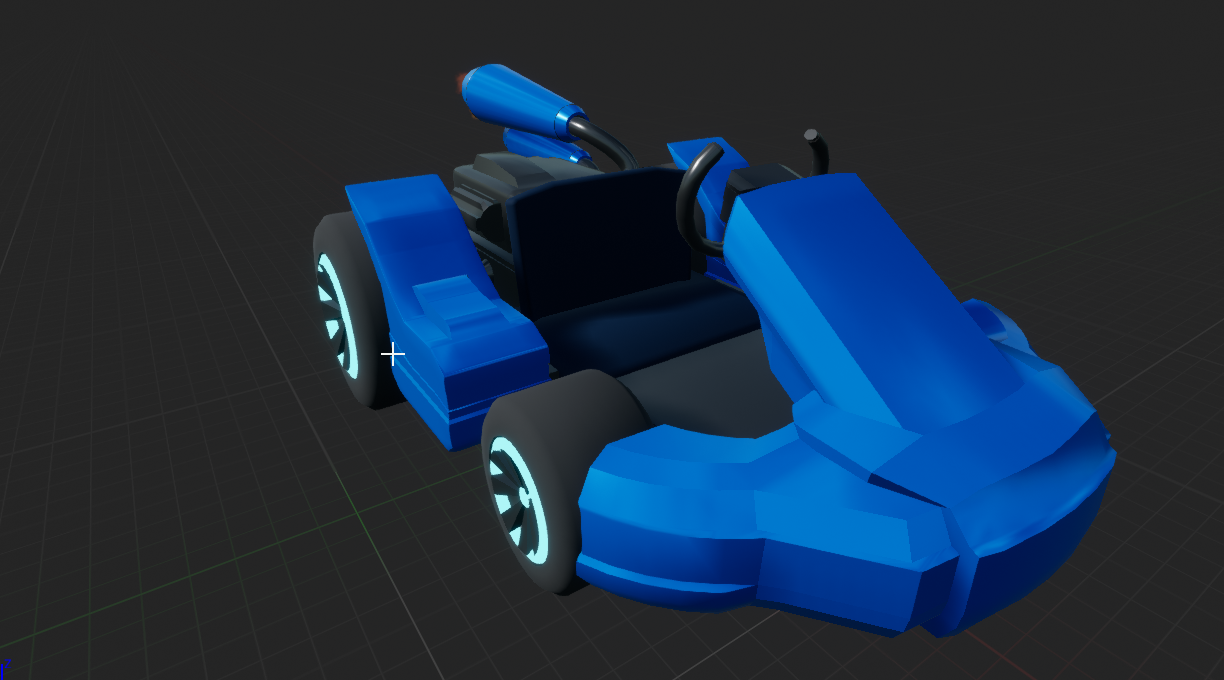
Kart Vehicle
The Kart Vehicle is more advanced than the Test Vehicle and is a demo on what a more advanced / real game vehicle could look like. It has a textured and animated Skeletal Mesh as well as some Blueprint logic hooked to the Blueprint Events API to trigger Material and Particles Effects.
Its behavior is different from the Test Vehicle:
- Very stable, it’s center of mass if adjusted to the center of its physics collision geometry and lowered
- Airborne stabilization, will never rollover
- Lot of suspensions damping
- Full adherence
- Drift settings will make it almost gain speed while drifting and it will have a big turn angle boost
Heavy and Light Kart Vehicles
new in v1.1
The heavy and light kart vehicles are simply two variations on the Kart vehicle to give an idea of some parameters that can be easily tweaked to quickly create different vehicles.
- The light kart as it names imply is lighter, it has a fast acceleration and low max speed. Its also less stable which means that it will easily jump when there’s bumps on the ground. It also has better turning.
- The heavy kart on the other side has a slow acceleration but a higher max speed. Its more stable and will stick to the ground.
Animation System
Animator Component
new in v1.1
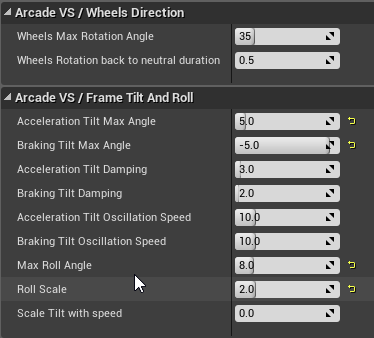
The Animation system has been changed in v1.1 and is now handled by a dedicated component. This component is responsible for computing all the values that the animation blueprint needs to properly animate the vehicle.
Animation Blueprint
new in v1.1
The Animation Instance Blueprint now also supports Wheels Offsets, Tilt and Roll.
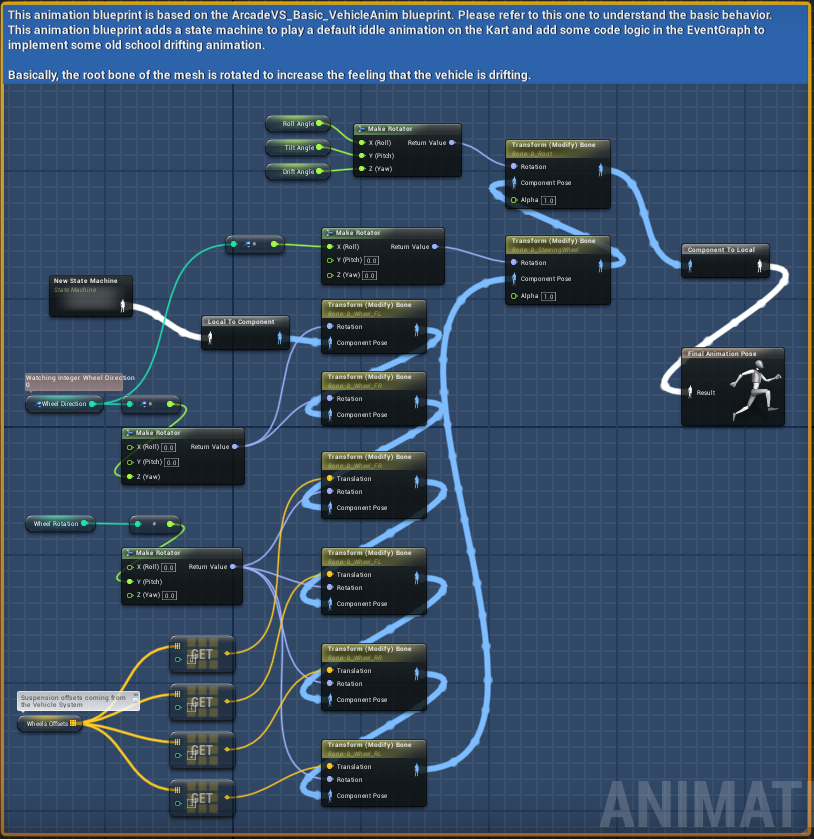
The Animation Instance Blueprints supports wheels rotation, front wheels direction and drift direction. All those values comes from the C++ interface and are updated each frame by the Vehicle System. The blueprint updates the position and rotation of each wheel bones to reflect the changes.
To use this blueprint, simply assign it to your skeletal mesh and update the names of the wheel bones in each Transform/Modify bone node.
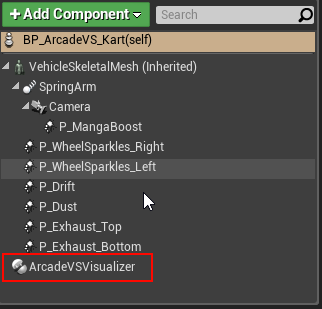
C++ Visualizer
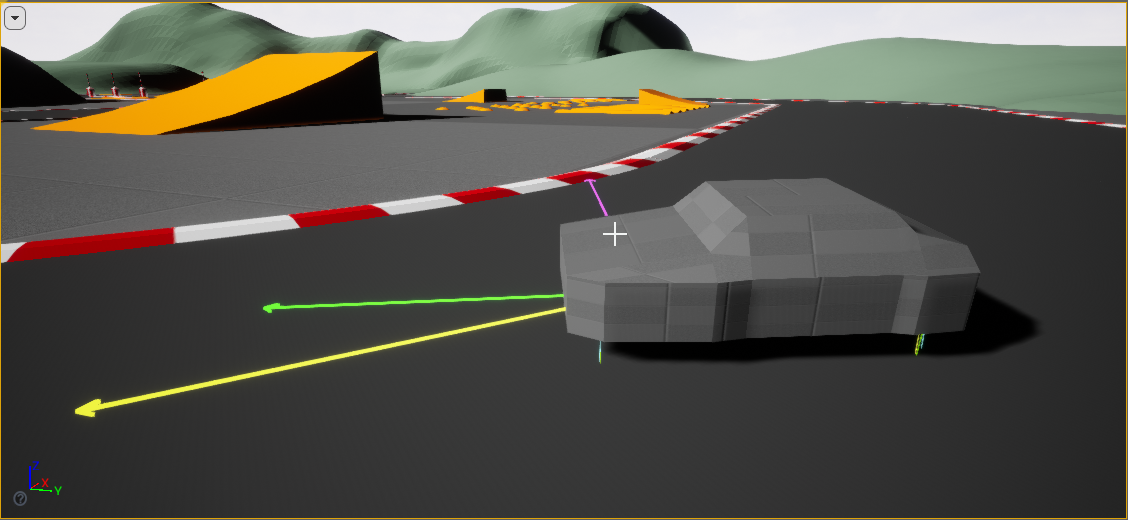
The C++ Visualizer is an Actor Component that can be added to any ArcadeVSVehicle class. It will help you debug and fine tune the setup of your vehicle by drawing on the screen the main forces applied to your vehicle at runtime.
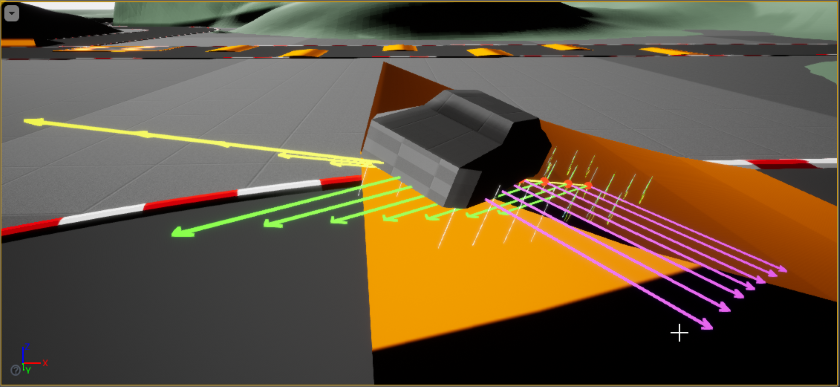 On this screenshot, the yellow arrow represents the velocity of the vehicle, the green arrow its acceleration and the purple one its adherence. You can also see the suspension raycasts. The vectors are drawn each frame and the time that they stay displayed can be configured. Here the time was set to .1 to see around 6f assuming we’re running @60fps (~0.0166)
Settings
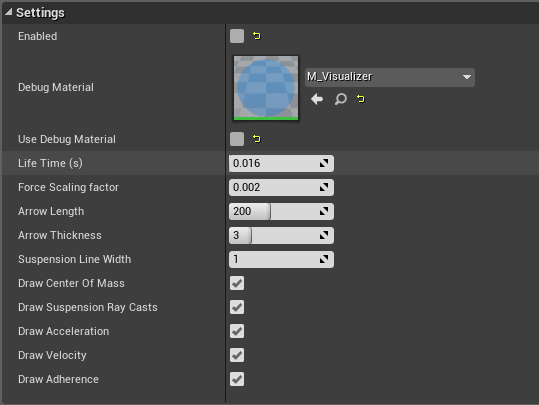
Here are some details about some parameters
- Debug Material: a custom material that will override the vehicle mesh material. This is quite handy for debugging the suspension system buy using a transparent material. This will allow you to exactly see the start and end point of the suspension raycasts as well as the center of gravity of the vehicle.
- Life Time: the time that each force / raycast drawn will stay displayed. The setting that I find the most usefull is to set it to 0.016 while locking your framerate at 60fps in the Editor by using the Console command t.MaxFPS 60. This will ensure that you only see all the forces for the current frame.
- Force scaling: To make the drawing of the forces relevant, they must have the same scale so that seeing a vector twice as big as another actually means that the force is twice as big. To do this, all forces are taken as is but are multiplied by a scale factor so that they don’t look completely oversized on screen. The default value should work in most cases but if you’re working on a huge or very small vehicle you may want to slightly adjust it.
By creating either a C++ or Blueprint class inheriting the Visualizer, you could add your own routines to draw any new or existing properties of your Vehicle that you would like to monitor/debug.